
Spotty wireless connections at home are a pain for many users in dense cities such as Singapore or Hong Kong.
One way to overcome this in the past was to buy a router that sported lots of antenna and more powerful transmission power to get past the walls.
That doesn’t always solve the problem, so today, the increasingly popular alternative is to go for mesh networking.
Essentially, this means planting more interconnected wireless nodes around your place so you get optimal coverage. Instead of simply increasing the speed wirelessly, which you can’t enjoy if a signal is poor, the idea is to improve the signal and coverage. This brings a more practical boost to performance.
Even better is the roaming feature. This means you can seamlessly walk from the bedroom to the living room and stay connected, without having to log in again to another Wi-Fi network, as you had to do in the past with separate repeaters or Wi-Fi access points.
So how do these mesh networking nodes talk to each other? As these nodes are also routers, most of them have both 2.4GHz and 5GHz channels to link with mobile devices and to each other.
Some manufacturers would use the 5GHz channel to communicate to each other wirelessly as a “trunk connection” using the fastest speed possible to deliver data to the other mobile devices in different parts of the network.
To maximise the data throughput rate between the nodes, placing the nodes at the most effective spots in the house is very important. You want them to connect at 5GHz, which has more bandwidth.
When setting things up at home, one good tool to have is the free app called WiFi Heatmap. It helps to illustrate areas in your home that have the strongest connection at 5GHz, so you know where to place your nodes in the mesh network.
Here are the steps I took:
1. Set up your main node
To get started, you need to set up your main node. This is the one that connects to the fibre broadband modem to get on the Internet.
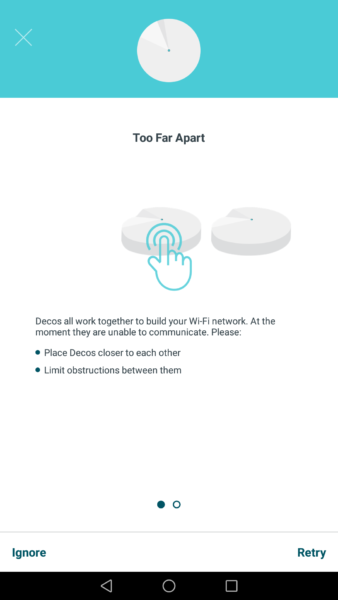
For this exercise, I used TP-Link’s S$459 Deco M5 kit. I fired up the Deco app and followed the instruction to set up the first node. For most users, this will be placed close to the fibre modem and fibre point.
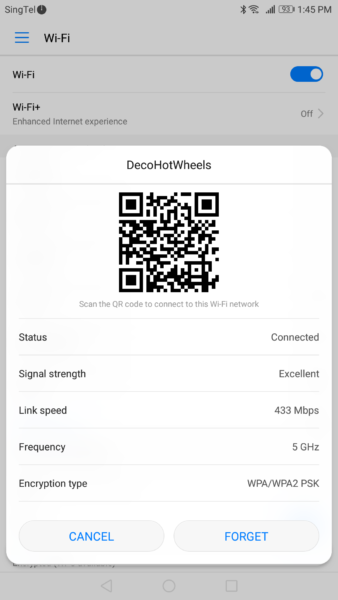
Once the Wi-Fi network is set up with the first node, check the speed of the connection using the 5GHz frequency channel. You can see this easily by accessing the Wi-Fi setting page and clicking on the network name.

2. Check the heat map at home
I then fired up the WiFi Heat Map app to find a good place for my second node. If you have a wired connection at home, you can simply bypass this and hook that up. For those who are going wireless all the way, you want to aim for a good 5GHz link.
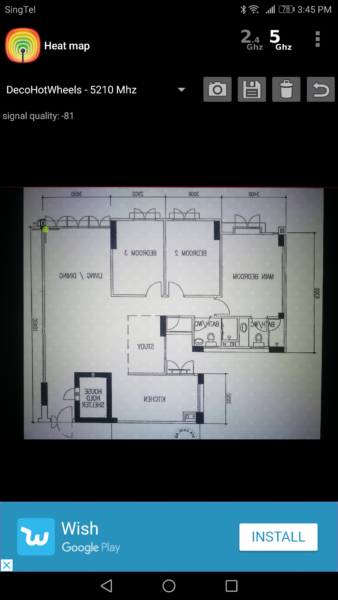
You can draw out your apartment’s layout. Or as I did, download from the Internet. In Singapore, it’s not uncommon for a real estate agent to have uploaded the layout of the same apartment you live in.
With this image in the heat map app, I could have a better idea of the Wi-Fi signal strength of each node. I then choose 5GHz for the wireless link and selected my Wi-Fi network name and mapped out the coverage in my home.
In my case, I started at the living room, which is in one corner of my apartment. When I reached each location on the map, I tapped on the screen and locked the signal strength of the Wi-Fi router at that location.
3. Pick a spot for your second node
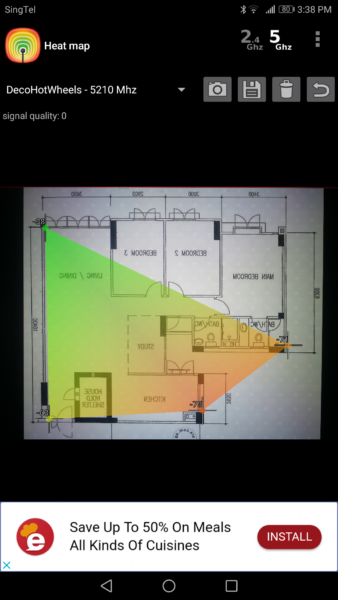
From there, I walked to all corners of my flat and poked on the screen corresponding to the location in the flat. The app takes the signal strength from the router and reflects that on the map.
Do this for the various spots at home and you’ll soon have an idea of the coverage. The more spots you go, the more accurate the heat map. With this information, I get a clearer idea on where to place the second node.
I just had to find a place near a power point that is within the green zone with great coverage from the first node. Good thing my desktop PC is within the green zone, so and I proceeded to add a second node to the mesh network using the TP-Link app.
3. Repeat to hook out other nodes
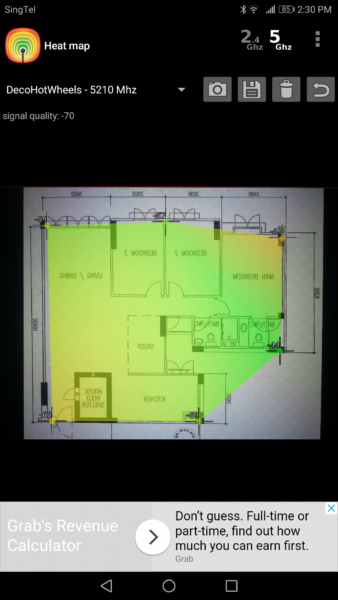
I then repeated the previous steps to install a third node. Do I go for a more central location? Yeah okay, but this meant it could reach the confines of my master bedroom but only just.
I decided to place the third node in the master bedroom at the furthest corner from the second node which was in the yellow zone of the Wi-Fi coverage.
I did all the required steps but TP-Link app told me that the location was not ideal and I had to change it. I settled instead on the bedside console, which was nearer to the bedroom door, where the signal was stronger. I was ready to roll!
4. Test the connection
The last step is to verify how good the connection. You can do this with a quick speed test with the Speedtest app. Some other mesh wireless kits, such as Google’s Wifi, have a test built in as well.
Remember, you will want to get a good 5GHz connection on your phone or laptop to try this. Of course, if this is not possible, you have to fall back to older 2.4GHz link, which can be more congested sometimes if your neighbours are also on it.
A disclaimer
Not all homes are are built the same. The building material of the walls and doors, the design and layout of the place, along with the location of your fibre point, will determine where to place your nodes.
For example, if you have a two-storey terrace house, you may want to place one node on each floor, perhaps close to the stairwell, so the signal can travel upwards, unhindered.
Of course, there’s nothing like a proper wired connection. The ideal is to have each room connected with Ethernet cables, so you can have the best link.
You can supplement this with a mesh networking kit too. Just connect each node to the wired link so you have a good trunk connection and still enjoy solid wireless links on mobile devices such as smartphones or tablets.
Even with the slower powerline connections, which make use of the electricity cables embedded in your walls to transmit data, the wired connection can prove more stable. In real-world tests, say, file downloads, the speed can be similar to what you get on a mesh networking kit like the Deco.
Still, there’s no denying the improvement that a mesh networking kit can offer. Unlike the past, where you are simply boosting your Wi-Fi signal in a contest of wills with your neighbour, now you are identifying your blind spots at home and casting a “light” in them. That’s a smarter way.


Hi
Possible to advise where did you get the wifi heat map app? i tried looking for it on the app store to no avail.
Hi Melvin. Yes the article is a bit old. You can get the latest apps by googling “wifi heatmapper” or “wifi heat map”
I got one here that I currently use
https://play.google.com/store/apps/details?id=ua.com.wifisolutions.wifiheatmap