By using this site, you agree to the Privacy Policy and Terms of Use.
Accept
TechgoonduTechgoondu
  • Audio-visual
  • Enterprise
    • Software
    • Cybersecurity
  • Gaming
  • Imaging
  • Internet
  • Media
  • Mobile
    • Cellphones
    • Tablets
  • PC
  • Telecom
Search
© 2023 Goondu Media Pte Ltd. All Rights Reserved.
Reading: DIY: Replacing the laptop battery on your Dell XPS 13
Share
Aa
TechgoonduTechgoondu
Aa
  • Audio-visual
  • Enterprise
  • Gaming
  • Imaging
  • Internet
  • Media
  • Mobile
  • PC
  • Telecom
Search
  • Audio-visual
  • Enterprise
    • Software
    • Cybersecurity
  • Gaming
  • Imaging
  • Internet
  • Media
  • Mobile
    • Cellphones
    • Tablets
  • PC
  • Telecom
Follow US
© 2023 Goondu Media Pte Ltd. All Rights Reserved.
Techgoondu > Blog > PC > DIY: Replacing the laptop battery on your Dell XPS 13
PC

DIY: Replacing the laptop battery on your Dell XPS 13

Alfred Siew
Last updated: November 9, 2021 at 10:30 AM
Alfred Siew Published November 7, 2021
5 Min Read
SHARE
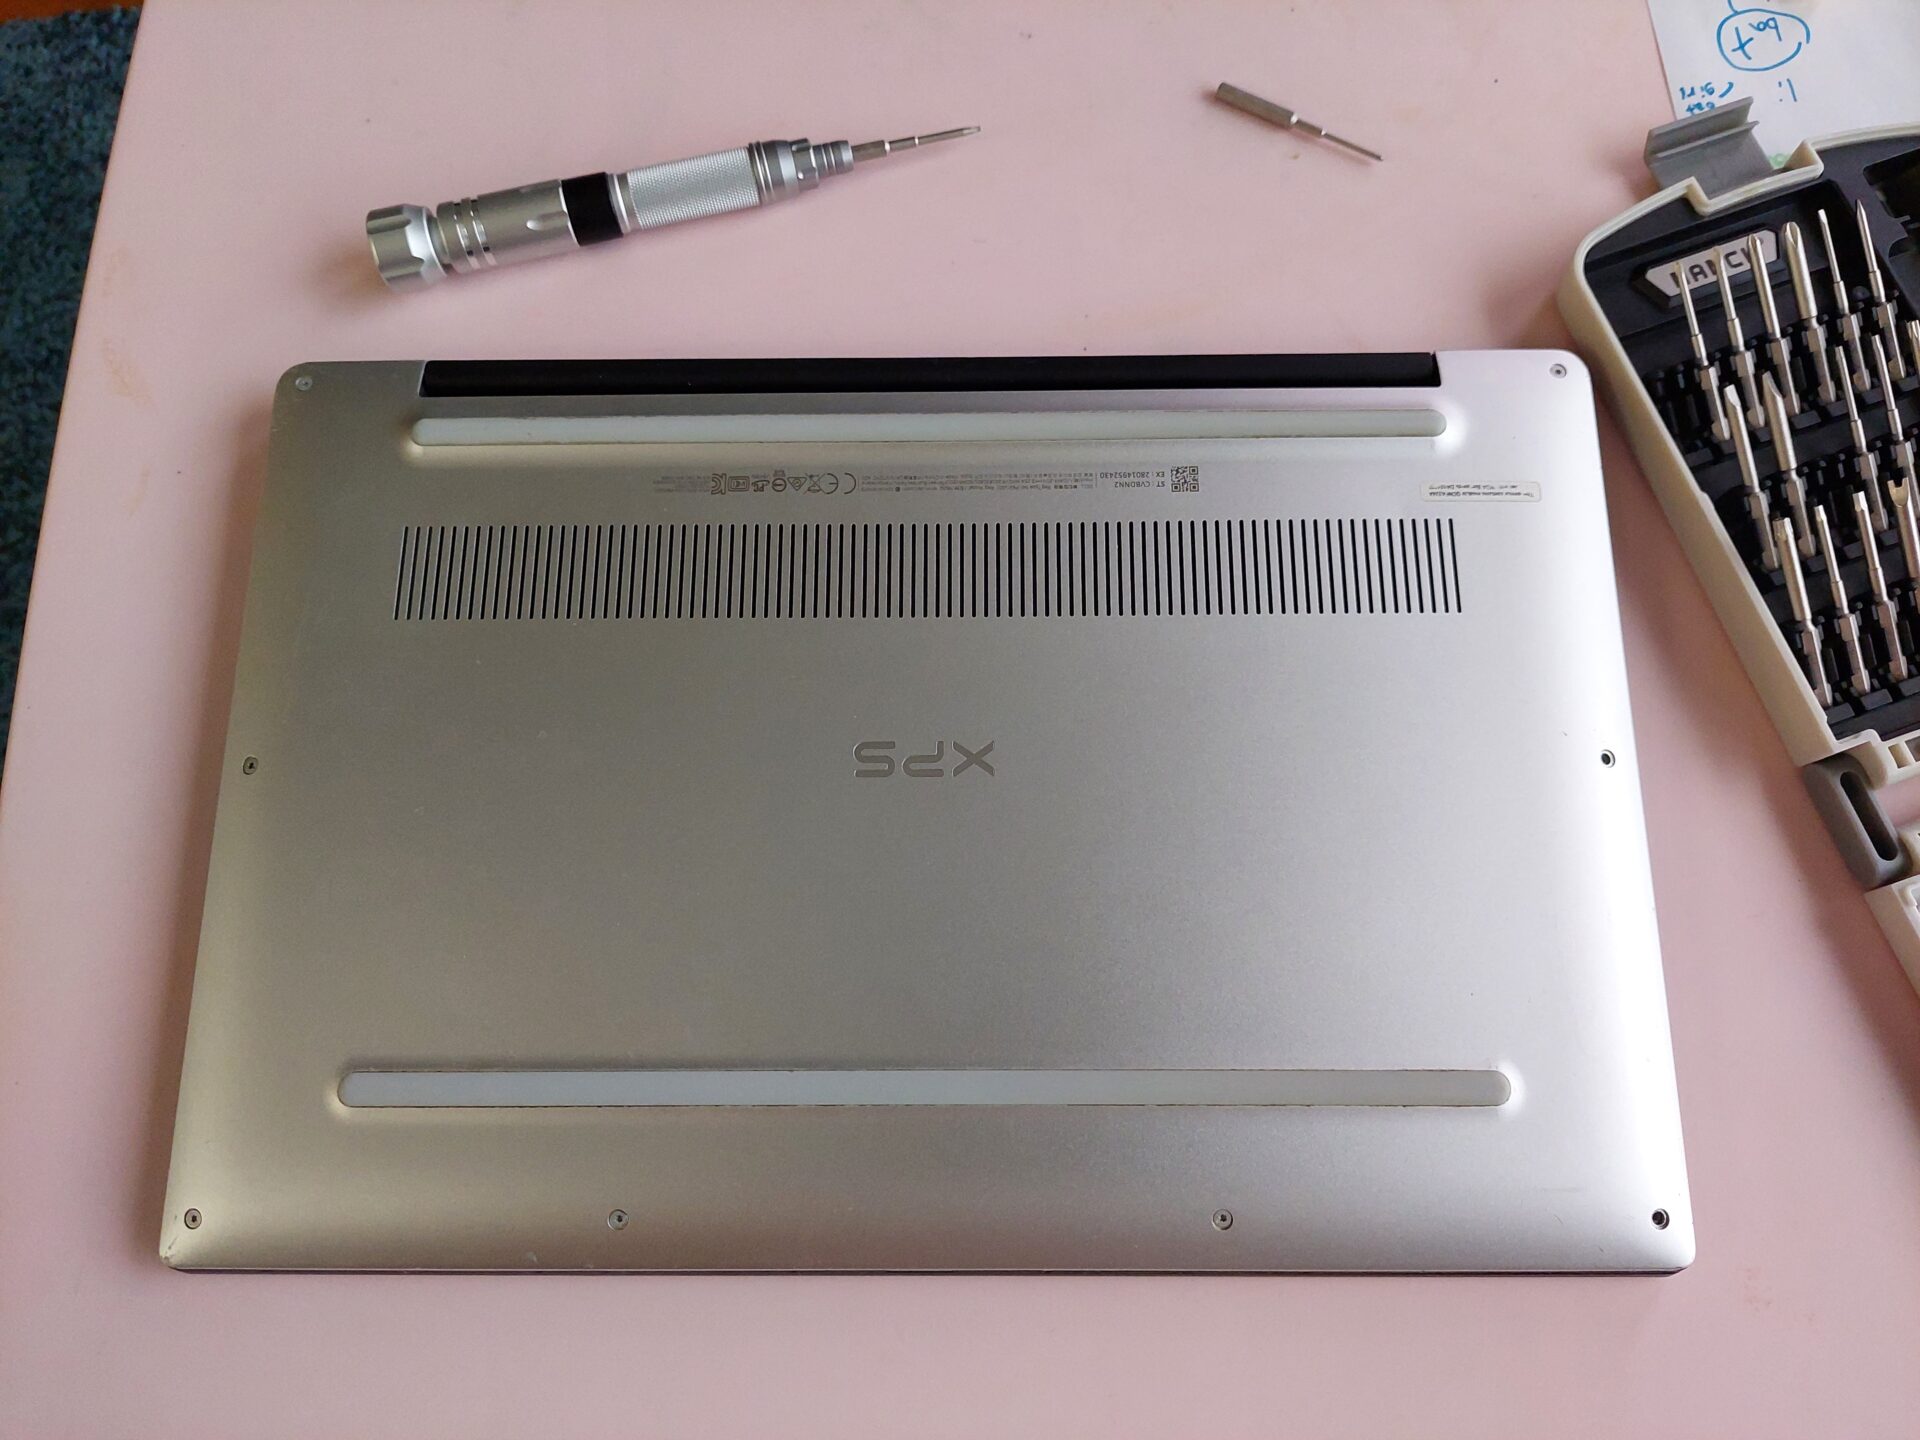
  • The back cover of the Dell XPS 13. PHOTO: Alfred Siew

Though looking a little battle-hardened, my Dell XPS 13 has been a loyal servant on my travels as well as a laptop that my kids now use for their online lessons. Almost four years old now, it’s been one of my favourite thin and light laptops.

Unfortunately, this is also around the time the battery gives up. In the past couple of weeks, it could only last about a half hour each time and the Dell power management app was telling me it was in poor condition.

Since the laptop, running an Intel Core i7 chip, 16GB RAM, 512GB solid state drive and a nice 4K touchscreen, is a high-end model, I decided to buy a replacement battery to extend its lifespan.

A quick search online found me a number of options, as well as suggestions for retailers in Singapore, typically at Sim Lim Square. For my XPS 13 model, a slim 52Wh power pack would typically cost about S$100, give or take.

The next day, I got one for my laptop at a repair shop in Sim Lim. I chose to save the S$30 or so for them to fix it, since it’s not difficult to unscrew the cover and just slot the replacement in and plug it back in.

  • You’d need the right screwdriver head to open up your laptop. PHOTO: Alfred Siew

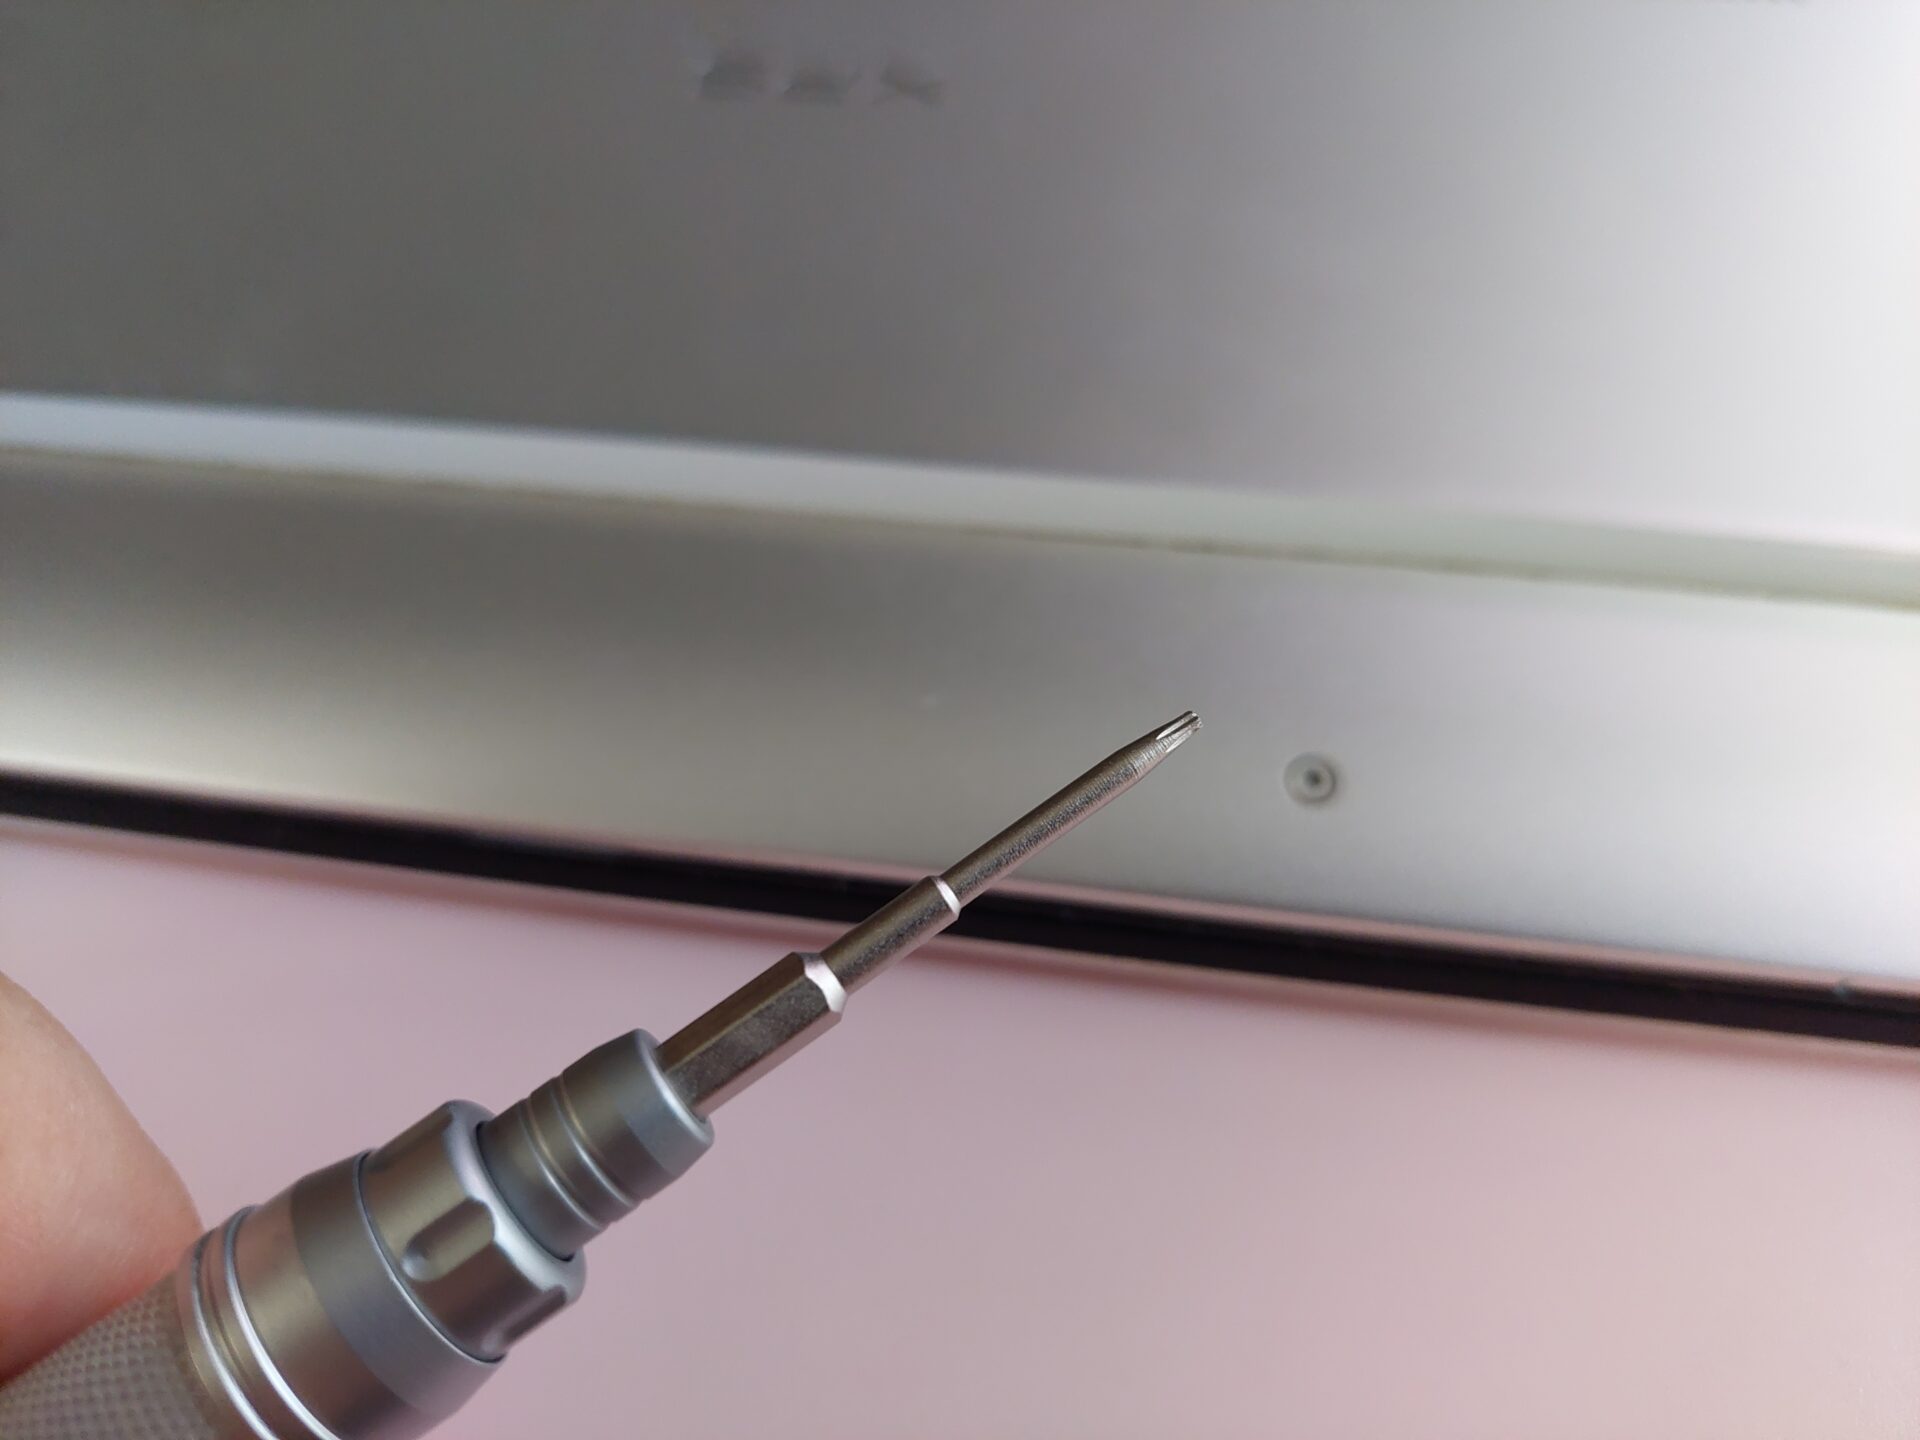
The thing to note is that you need a Torx T5 screwdriver head, and not just your usual Philips or crosshead screwdriver head. Being kiasu, I bought a set of them from Amazon, at a fairly good price of S$16.90.

Next up, the task was to simply unscrew the various screws on the back cover of the laptop. This is done with the Torx T5 screwdriver head. Then you’d need to carefully slide in a slim screwdriver head or a card (that is softer) to gently pry open the sides and slowly take out the back cover.

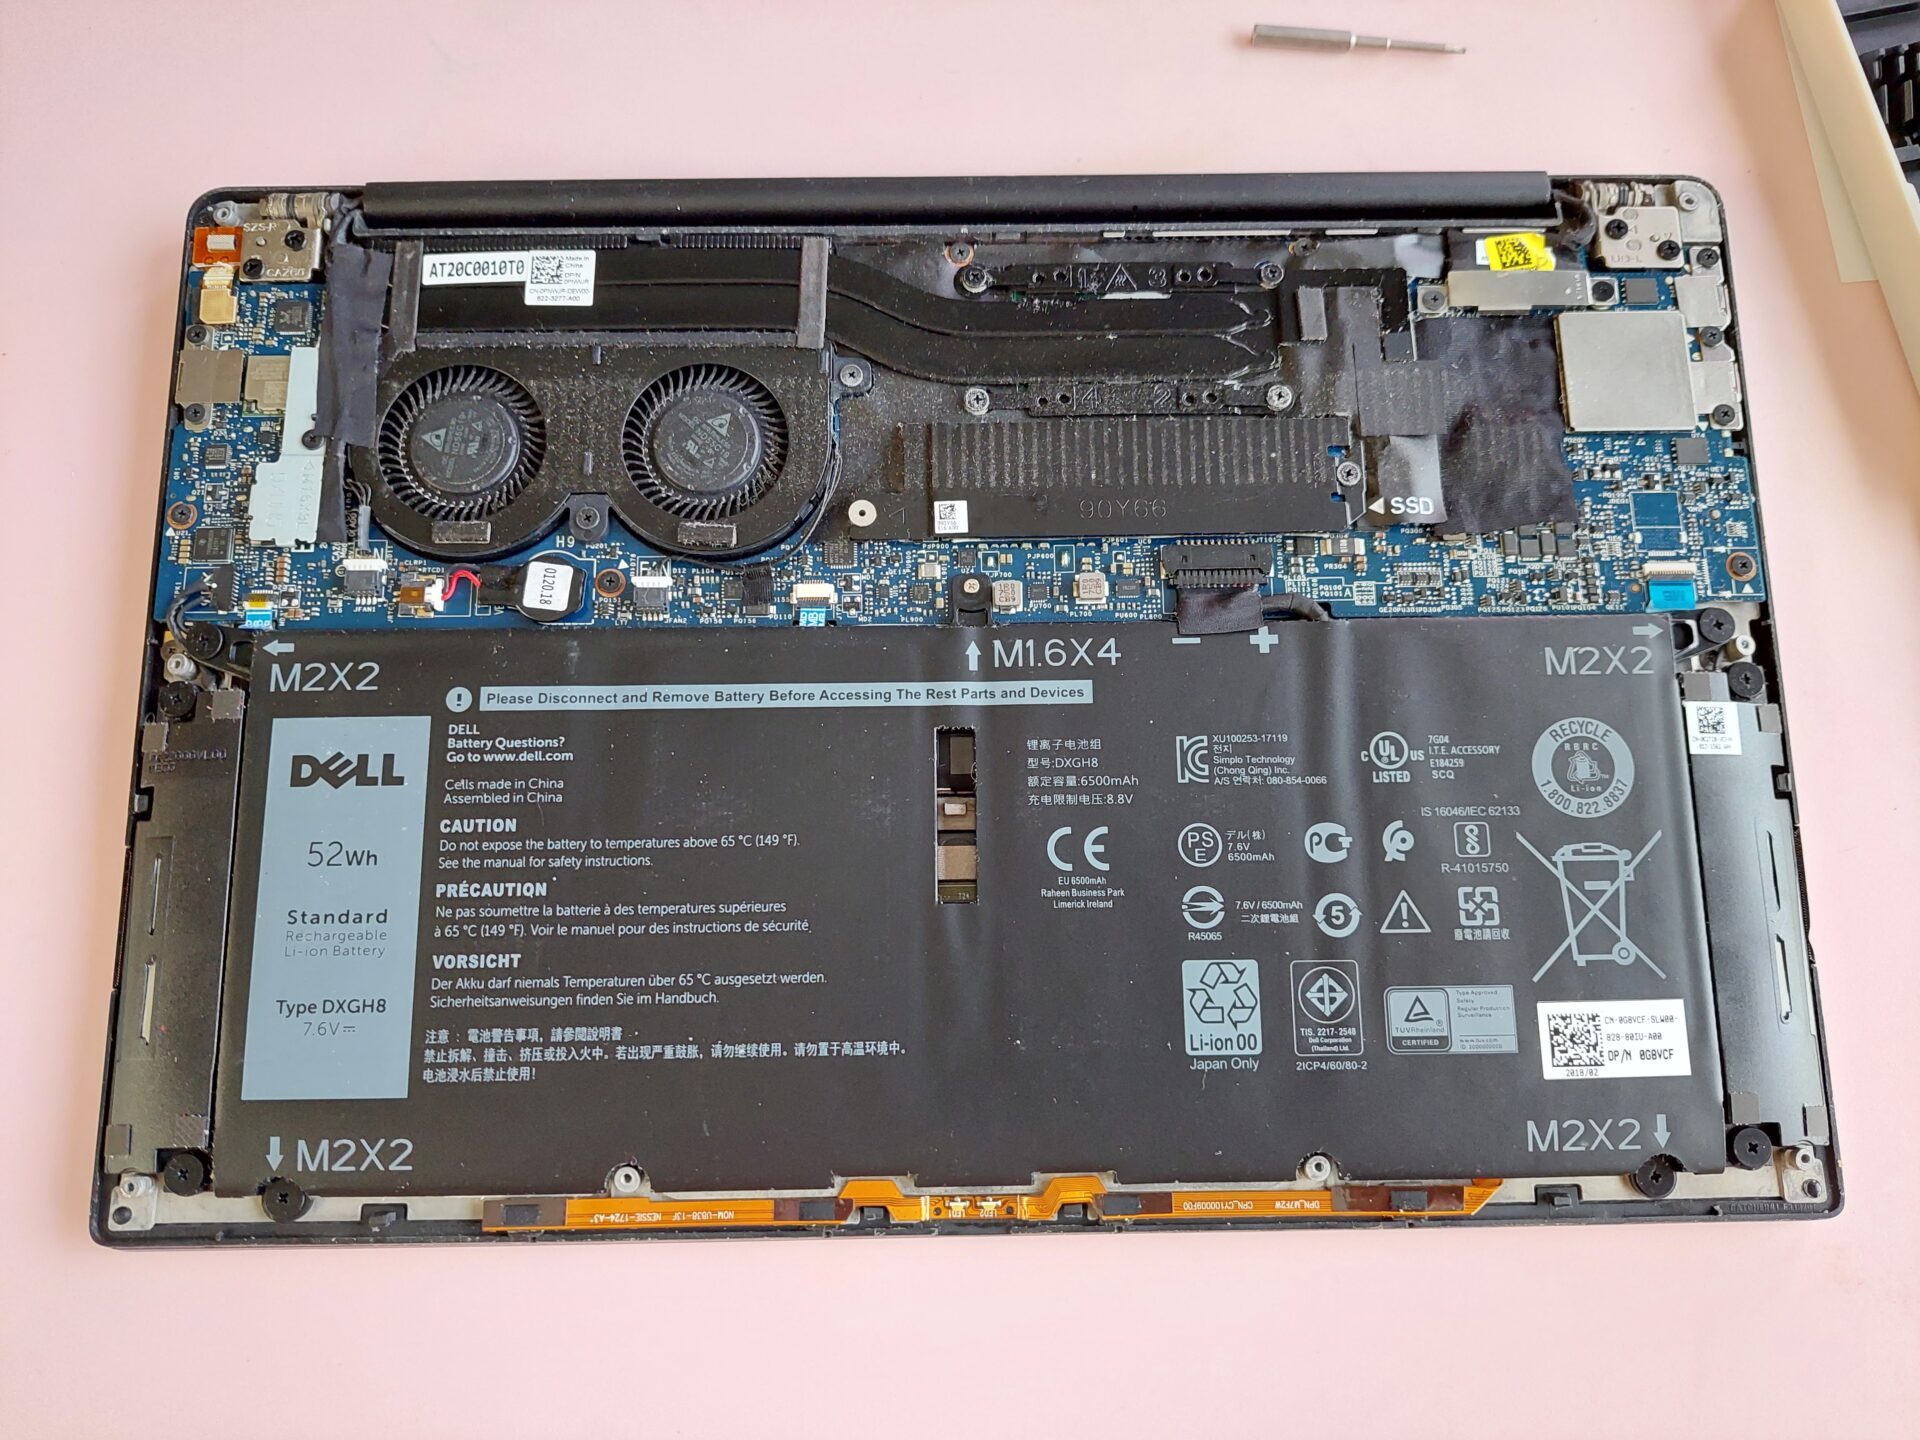
Next, you’d need to get out the screws holding down the battery to the chassis. Once done, you have to unplug the power plug from the motherboard.

Do this carefully as you don’t want to get one of the pins broken and stuck in there. Gently use a flat screwdriver head if you wish. Or use your fingers, like I did.

When this is done, just slide in your replacement battery and plug back the power. Retracing your steps, tighten down the battery and then put the back cover back on.

  • This is the inside of the Dell XPS 13. The battery you have to remove is the package at the bottom. PHOTO: Alfred Siew

This should do it if you had made sure your power connection was good. Don’t forget to check your Dell power management app to see that everything is running fine.

One more note – buy batteries from trusted sources because you don’t want sparks to fly and a fire to break out at home due to a faulty battery. Unfortunately, Dell doesn’t seem to sell the batteries to Singapore consumers directly so I had to get mine from a third party.

The good news is, the laptop is good as new now. Well, at least when it comes to battery power. It goes back to the six hours or so that I used to get on battery, plus and minus, depending on what I’m doing on the laptop.

If your laptop battery is bad, do consider if you can replace it before junking it altogether and buying a new one.

You Might Also Like

Sony Playstation VR2 review: An immersive experience awaits

Get the best Mac-friendly monitors for colour-perfect design work

LG OLED Flex LX3 review: A bendable gaming monitor for the adventurous (and rich)

Samsung Galaxy S23 Ultra review: Impressive flagship design, performance

Hands on: Oppo Find N2 Flip looks promising for those seeking foldable phones

TAGGED: Dell, diy, laptop, laptop battery, repair, Singapore price and availability, xps 13

Sign up for the TG newsletter

Never miss anything again. Get the latest news and analysis in your inbox.

By signing up, you agree to our Terms of Use and acknowledge the data practices in our Privacy Policy. You may unsubscribe at any time.
Alfred Siew November 7, 2021
Share this Article
Facebook Twitter Whatsapp Whatsapp LinkedIn Copy Link Print
Share
Avatar photo
By Alfred Siew
Follow:
Alfred is a writer, speaker and media instructor who has covered the telecom, media and technology scene for more than 20 years. Previously the technology correspondent for The Straits Times, he now edits the Techgoondu.com blog and runs his own technology and media consultancy.
Previous Article Why I bought a Samsung Galaxy A52s instead of another flagship phone
Next Article Hands on: Rakuten Kobo Sage comes with a handy stylus
3 Comments
  • peters says:
    February 20, 2023 at 9:13 pm

    Can you clearly explain how to “carefully slide in a slim screwdriver head or a card (that is softer) to gently pry open the sides and slowly take out the back cover”?

    Reply
  • Nigel Robertson says:
    August 10, 2022 at 2:51 pm

    Nice helpful article, thanks

    Reply
  • Jay says:
    May 29, 2022 at 9:19 am

    Hey Alfred, awesome article. Wanted to know which store in particular did you get the battery from? My battery is faulty and is due for replacement as well.

    Reply

Leave a Reply Cancel reply

This site uses Akismet to reduce spam. Learn how your comment data is processed.

Stay Connected

Facebook Like
Twitter Follow

Latest News

As TikTok faces a possible ban in the US, should users elsewhere be worried?
Cybersecurity Internet March 24, 2023
Foodpanda to use Gogoro electric scooters in battery swapping trial with Cycle & Carriage
Enterprise Internet March 23, 2023
RedCap: A new cellular IoT technology for the 5G era
Enterprise Software Telecom March 23, 2023
Sony Playstation VR2 review: An immersive experience awaits
Gaming March 21, 2023
//

Techgoondu.com is published by Goondu Media Pte Ltd, a company registered and based in Singapore.

.

Started in June 2008 by technology journalists and ex-journalists in Singapore who share a common love for all things geeky and digital, the site now includes segments on personal computing, enterprise IT and Internet culture.

banner banner
Everyday DIY
PC needs fixing? Get your hands on with the latest tech tips
READ ON
banner banner
Leaders Q&A
What tomorrow looks like to those at the leading edge today
FIND OUT
banner banner
Advertise with us
Discover unique access and impact with TG custom content
SHOW ME


POWERED BY READYSPACE
The Techgoondu website is powered by and managed by Readyspace Web Hosting.

TechgoonduTechgoondu
Follow US

© 2023 Goondu Media Pte Ltd. All Rights Reserved | Privacy | Terms of Use | Advertise | About Us | Contact

Join Us!

Never miss anything again. Get the latest news and analysis in your inbox.

Zero spam, Unsubscribe at any time.
 

Loading Comments...
 

    Welcome Back!

    Sign in to your account

    Lost your password?